
For any budding baseball player or even a seasoned pro, improving your throwing velocity can make a significant difference on the field. Whether you’re a pitcher aiming for the big leagues or an outfielder wanting to make those crucial throws to home plate, speed matters. But how can you throw a baseball faster? Let’s unlock the secrets.
Basics of Throwing a Baseball Faster
To throw a baseball faster, you need to master the basics. In order to improve your throwing velocity, focus on the proper grip on the baseball, stance and alignment, and establishing a strong throwing foundation. These sub-sections will provide you with practical solutions to enhance your throwing speed effectively.
Proper Grip on the Baseball
A proper grip is vital to throwing faster. Place your fingertips on the seams and apply pressure with the pads of your fingers. This gives better control and spin. To get the most out of your grip, slightly tuck your thumb underneath the ball. You can also experiment with different finger placements for a more comfortable and efficient grip.
In addition to finding the right grip, wrist action can significantly increase throw speed. Focus on snapping your wrist forward when throwing for added power and velocity. Hand strength is also important. Squeezing stress balls and using grip trainers can improve hand muscles.
To sum it up, the perfect grip is necessary to throw faster. Finger placement, wrist action, and hand strength are all important factors. Incorporate these suggestions into your training regimen to up your game and throw more formidable pitches. Ready? Get your perfect stance and alignment – because nothing says ‘I mean business’ like throwing a baseball!
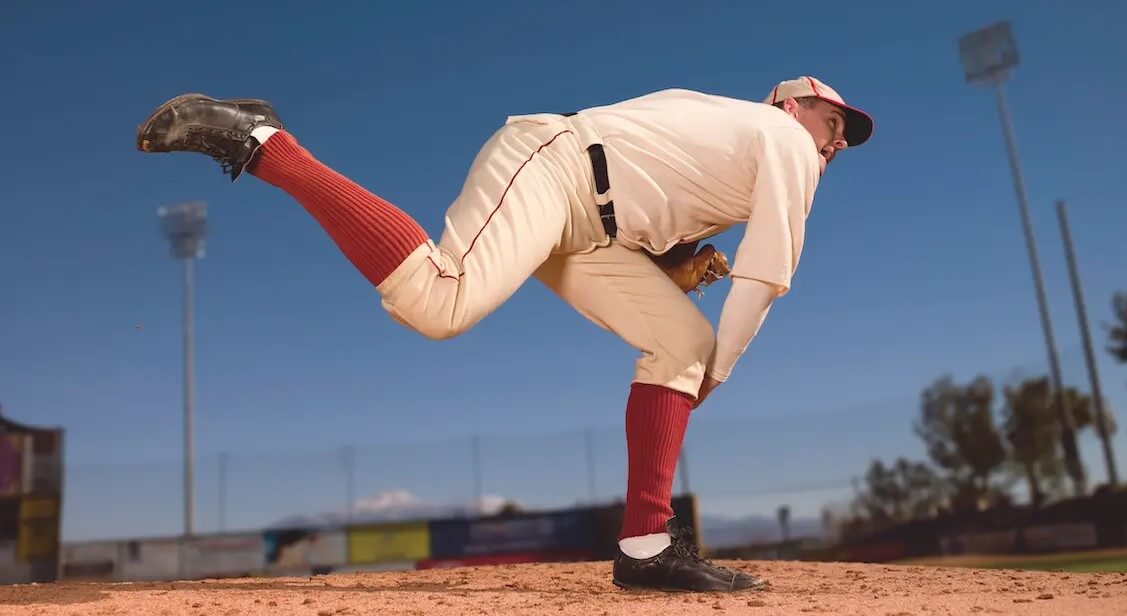
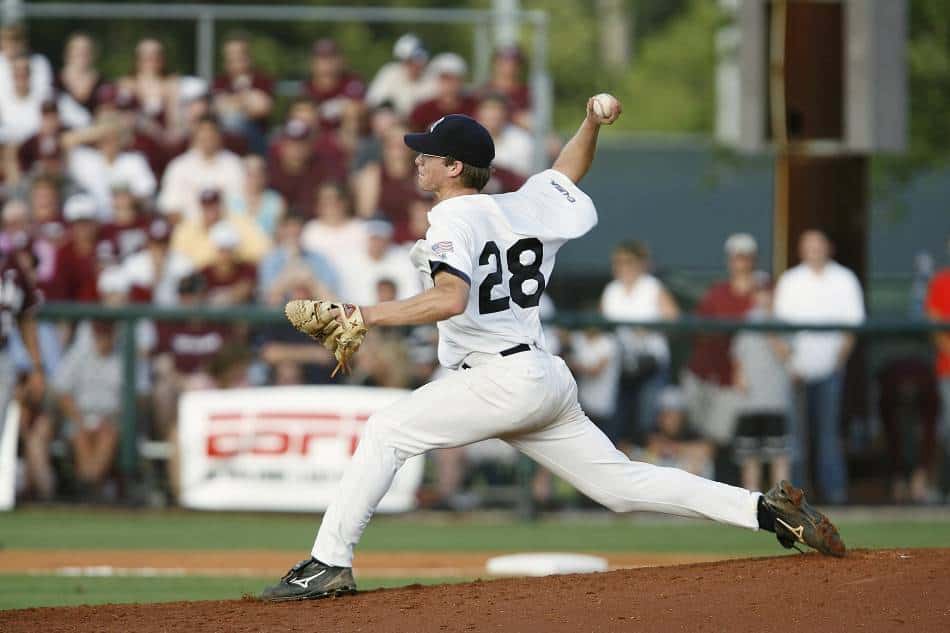
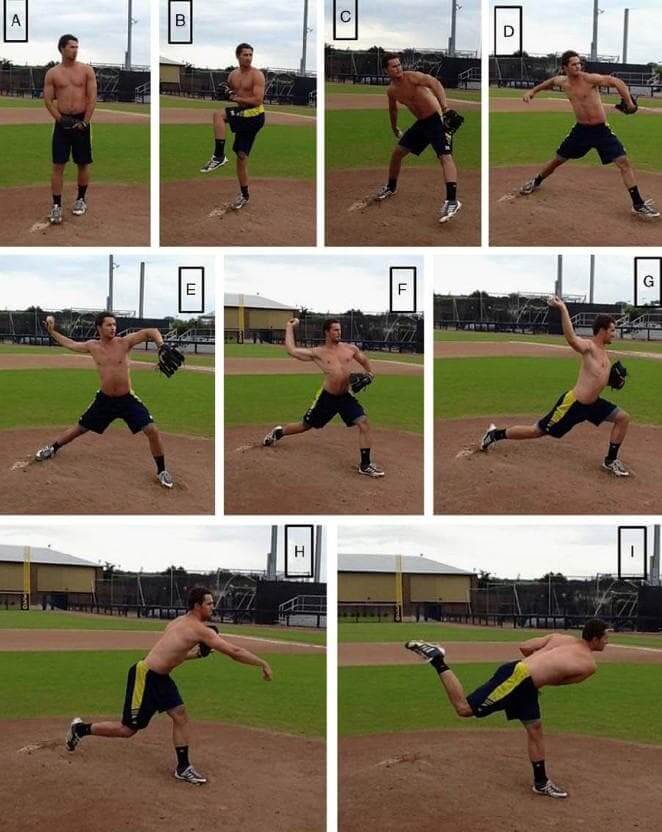
Stance and Alignment
Throwing a baseball faster requires the right stance and alignment. Your body’s positioning plays a key role in increasing your throw’s velocity. Have the correct posture and line up your body properly to gain more power and accuracy in your throws.
Here is an illustration of the stance and alignment for throwing a baseball faster:
Right-handed Thrower: Feet Shoulder-width Apart. Bent Knees, Slightly Crouched. Open Shoulders. Target Shoulder Pointing to Target.
Left-handed Thrower: Feet Shoulder-width Apart. Bent Knees, Slightly Crouched. Open Shoulders. Target Shoulder Pointing to Target.
Apart from that, it’s necessary to have an even weight distribution on both feet for stability and power. Your throwing hand needs to be at the back, ready to send an explosive throw. Make sure your non-throwing arm is slightly outstretched for balance. This stance and alignment combination enhances your capacity to produce maximum force while controlling it.
At a baseball camp, the instructor spoke about the value of proper stance and alignment. He told us a story of a student of his who couldn’t reach high speeds or accuracy in his throws. After analyzing his technique, it was determined his stance and alignment weren’t ideal. After some adjustments and training, he was able to make accurate throws with greater speed. It highlighted the importance of stance and alignment for throwing a baseball.
By understanding the significance of stance and alignment when throwing a baseball, you can get better at it. Keep the correct posture, line up your body to the target, and equally distribute your weight for stability and power. With practice and dedication, you can sharpen your throwing skills and become a fearsome force on the baseball field. So, get ready to build a throwing foundation so sturdy, even rumors of a zombie apocalypse won’t knock it down.
Establishing a Strong Throwing Foundation
Step up your throwing game with these tips to throw a baseball faster! Focus on:
- Proper Mechanics, such as grip, arm angle, and release point.
- Strengthening shoulder muscles for power and injury prevention.
- Core stability for a strong base and more power.
- Balancing and footwork for a fluid motion.
- Mental preparedness for focus and precision.
- Dedicated practice to refine technique and build muscle memory.
In addition, pay attention to hand-eye coordination, flexibility, and overall athleticism. These unique factors can make a huge difference in establishing a strong throwing foundation.
To get the most out of these suggestions, here’s what each does:
- Proper mechanics help transfer energy from your body to the ball, resulting in increased velocity.
- Strengthening shoulder muscles prevents fatigue and injuries.
- Core stability gives a platform to generate rotational power.
- Balance and footwork use the entire body for a throwing motion.
- Mental preparedness keeps you focused and executing throws with precision.
- Dedicated practice refines skills over time through repetition.
By following these pointers and understanding the principles behind them, you are sure to establish a strong throwing foundation. Keep honing your technique and strive for improvement!
Focusing on Arm Strength
To improve your baseball throwing speed, focus on arm strength. Strengthen your arm muscles through specific exercises, utilize resistance bands for targeted arm strength, and don’t overlook the importance of warming up and stretching. These sub-sections offer effective solutions to enhance your arm strength for better performance in throwing a baseball faster.
Exercises to Strengthen the Arm Muscles
Arm-strengthening exercises can give you lots of benefits – from better-looking arms to improved strength and agility. Try these exercises for an impressive result!
- Push-ups: Target your chest, shoulders and triceps by starting in a plank pose, with hands under your shoulders. Lower your chest to the floor, then push back up.
- Bicep Curls: Focus on building bicep strength – located at the front of your upper arm – by holding dumbbells. Stand with feet shoulder-width apart, elbows close to your torso, and curl the weights up towards your shoulders.
- Diamond Push-ups: This variation of the push-up targets triceps muscles. Start with a standard push-up position, but bring your hands closer together, forming a diamond shape below your chest. Lower yourself with elbows tucked in.
Get the most out of these workouts with proper form and precision. Also, challenge yourself by gradually increasing weight or repetitions. Don’t forget to rest and give your muscles time to repair and build up strength.
By consistently doing these exercises with good form, you can get significant improvements in arm strength and muscle tone. So, start incorporating these exercises into your fitness plan now!
Utilizing Resistance Bands for Arm Strength
Resistance bands are great to get stronger arms. Add them to your workout routine and you’ll see results.
Here’s how to use them:
- Start with bicep curls. Hold the band firmly and step on it with one foot. Curl your arm up slowly, keeping tension on the band.
- For tricep extensions, attach the band at shoulder height to a stable structure. Hold the band with both hands and extend your arms, engaging your triceps.
- Lateral raises use resistance bands too. Stand on the center of the band with both feet. Lift your arms outwards to shoulder height and return.
- To make push-ups even better, loop the band around your back and hold onto each end. Perform push-ups feeling the added resistance.
For best results, vary exercises, increase resistance gradually and keep proper form. Dedication will pay off in increased strength and definition. Warm up and stretch before exercising to avoid injury. Now grab those bands and get ready to feel the burn!
Importance of Warming Up and Stretching
Warming up and stretching are essential to avoid injury and get your body ready for exercise. It loosens muscles, increases blood flow, and boosts performance.
Here are some benefits of warming up:
- Flexibility: Improves range of motion in joints.
- Circulation: Blood flow to muscles increases; delivering oxygen and nutrients, removing waste.
- Injury prevention: Prepares muscles for exercise, reducing the risk of tears, sprains, and strains.
- Coordination: Dynamic movements enhance coordination between muscle groups.
- Mental preparation: Helps you focus on the activity.
- Muscle activation: Activates muscles for optimal functioning.
Target muscle groups relevant to the planned exercise to maximize the effectiveness of the warm-up routine. Light aerobic exercises like jogging or cycling will further increase joint mobility. Include dynamic stretches mimicking the activity to increase performance. Remember to do each stretch slowly and don’t force any movements beyond a comfortable range. For maximum speed, pretend you’re being chased by a pack of zombies!
Improving Technique for Maximum Speed
To improve technique for maximum throwing speed in baseball, focus on generating power from the legs and hips, incorporating proper arm extension, and utilizing the full range of motion in the throwing motion. These sub-sections provide solutions to enhance your performance and increase your throwing velocity.
Generating Power from the Legs and Hips
Generating power from the legs and hips is a must for achieving top-notch speed. The lower body has a major role in propelling one forward, and proper technique can immensely help performance.
Here are 3 key points for harnessing power from the legs and hips:
- Stability: Staying stable is essential for producing power. Engaging core muscles and maintaining correct posture helps distribute the force throughout the body for efficient transfer of energy from the legs to the hips.
- Muscle Activation: Activating the right muscles is key for maximum power. Focusing on engaging the glutes, quadriceps, hamstrings, and calf muscles during explosive movements is beneficial for pushing the body with greater power.
- Hip Flexibility: Adequate flexibility in the hips is needed for peak power. By guaranteeing enough range of motion in the hips, athletes can make the most of their leg strength while reducing the risk of injury.
Then there are other factors to consider when generating power from the legs and hips, like a proper warm-up with dynamic stretching exercises so the lower body is ready for explosive movements without affecting muscle elasticity.
As an example, Usain Bolt showcases the impact of generating power from the legs and hips. Known for his remarkable speed, Bolt credited a significant portion of his success to his capability to generate exceptional power from his legs and hips. Through years of intensive training focusing on building lower body strength and refining his technique, Bolt revolutionized sprinting by smashing multiple world records and becoming one of the greatest athletes of all time.
By understanding and applying techniques to draw power from their legs and hips, athletes can significantly better their performance in sports or activities that need speed and explosiveness. The combo of stability, muscle activation, hip flexibility, and focused training can lead individuals to unlock their full potential and reach new heights in their athletic pursuits. Don’t forget arm day – it’s the only extension you’ll ever need to reach maximum speed.
Incorporating Proper Arm Extension
Incorporate proper arm extension and blast off with maximum speed in your activities! Mastering this skill will boost performance and get you to the finish line faster.
Here’s a 6-step guide to get you started:
- Stand with feet shoulder-width apart.
- Keep arms relaxed and engaged.
- Bend elbows at 90° on forward motion.
- Extend arms fully forward with fluid motion.
- Keep wrists straight and aligned.
- Coordinate arms with body for balance.
By incorporating proper arm extension you’ll be speedy and efficient. It maximizes propulsion and minimizes energy wastage, plus it prevents injuries associated with improper arm movements. Olympic sprinters like Usain Bolt credit their success to impeccable form in this area. So, break those speed records and go, go, go!
Utilizing the Full Range of Motion in the Throwing Motion
Maximizing speed and efficiency in a throwing motion requires full range of motion. To utilize it to its fullest, four important points to consider are: body alignment, shoulder mobility, hip rotation, and arm extension.
Body alignment is necessary to effectively use the full range of motion. Keeping a straight posture allows optimal transfer of force. Shoulder mobility is needed for a complete follow-through. This ensures maximum speed and distance. The hips generate power, so rotating them fully increases torque and momentum. Lastly, arm extension increases leverage and kinetic energy transfer.
Each individual may have unique biomechanics when using full range of motion. Factors like height, body type, and flexibility can all impact how an athlete optimizes their technique.
A study published in The Journal of Strength & Conditioning Research found that athletes who focused on improving their range of motion through stretching exercises saw an improvement in their overall throwing velocity.
Speed training drills are also important in optimizing technique for maximum speed. Running from your responsibilities isn’t just for procrastinators, it’s for athletes too!
Incorporating Speed Training Drills

To incorporate speed training drills into your baseball throwing technique and increase your velocity, try the following solutions: Long Toss Drill for Increasing Arm Speed, Plyometric Exercises for Explosiveness, and Interval Training for Quick Twitch Muscle Fibers. Each sub-section will provide you with valuable insights on how to improve your throwing speed effectively.
Long Toss Drill for Increasing Arm Speed
Speed training drills can boost your field performance! Long Toss Drill is one such drill to up your arm speed.
Here’s how:
- Warm up with light tossing or stretching exercises.
- Start at a comfortable distance for good form. Increase the distance as you go.
- Focus on using proper mechanics and technique. Keep your elbow at shoulder height and use a strong, fluid motion.
- Gradually increase intensity of throws. A mix of short, controlled throws and longer, powerful throws.
- Listen to your body – avoid strain. Take breaks and stay hydrated.
This drill helps improve accuracy and overall throwing ability. Practice regularly for great improvements.
Pro Tip: Add resistance bands to your Long Toss Drill for more strength and power. Attach the band to a fence or sturdy object to get an extra boost!
Plyometric Exercises for Explosiveness
Plyometric exercises are powerful for boosting explosiveness and power. Short, explosive movements trigger fast-twitch muscle fibers, leading to improved speed and agility.
Here are five key points to understand about plyometric exercises:
- Jumping exercises, such as box jumps and depth jumps, enhance lower body explosiveness. These exercises require you to use maximum force in a short amount of time, which leads to increased power during athletic movements.
- Hopping exercises, like lateral hops and single-leg hops, focus on strengthening the muscles used in lateral movement and agility. Doing these exercises can help you change direction quickly and efficiently.
- Medicine ball throws build upper body power. Explosive throws target the chest, shoulders, and triceps muscles quickly. Regular practice of medicine ball throws can increase throwing velocity or striking power.
- Bounding exercises involve dynamic movements that mimic running strides. This strengthens leg muscles and power, while also improving coordination and balance. Doing bounding drills can result in faster sprinting speeds.
- Plyometric push-ups are great for explosive upper body strength. By performing push-ups with enough force to lift your hands off the ground between repetitions, you engage the fast-twitch muscle fibers in your chest, shoulders, and triceps.
To get the most out of plyometric exercises for explosiveness, remember these tips:
- Include various plyometric exercises in your training program to target different muscle groups and movements.
- Start with basic exercises and gradually increase intensity or difficulty over time.
- Ensure proper form and technique to lessen the chance of injury. Maintain good landing mechanics and don’t stress joints too much.
- Allow sufficient recovery time between plyometric workouts so your muscles can heal and adjust to the training stimulus.
- Track performance metrics, such as jump height, sprint times, or throwing distance. This will help you identify if your training program is working and make any needed changes.
If you use plyometric exercises in your training and follow these suggestions, you can significantly increase explosiveness and power, and ultimately improve athletic performance. Get ready to unleash your fast-twitch muscle fibers with interval training, because nothing says ‘pain is gain’ like feeling your muscles burn!
Interval Training for Quick Twitch Muscle Fibers
Interval training is great for activating quick twitch muscle fibers. This involves alternating between periods of exercise and rest. It can improve your performance and fitness level.
Here are six key points to consider:
- Vary the length of intervals – mix high-intensity and rest periods.
- Experiment with different intensities – adjust to suit your level.
- Include a variety of exercises – target different muscle groups.
- Focus on proper form – to prevent injuries and maximize effectiveness.
- Use a timer or stopwatch – to measure progress.
- Gradually increase volume – start small, then build up.
Interval training can be tailored to individual goals. Warm up before starting. Consider resistance training. Listen to your body and rest between intervals. Don’t forget recovery. Follow these suggestions and unlock the power of intervals!
Developing a Consistent Release Point

To develop a consistent release point for throwing a baseball faster, employ various techniques for practicing a proper arm slot and release point, engaging in drills that foster a repeatable delivery, and correcting common mistakes in release point. These sub-sections provide solutions to achieving a more reliable and powerful throw.
Practicing Consistent Arm Slot and Release Point
For throwing success, a consistent arm slot and release point are must-haves!
Follow this five-step guide to master it:
- Identify your natural arm slot: Stand on the mound or in throwing position and throw a few practice pitches. Notice the angle your arm releases the ball without straining. This is your natural arm slot.
- Create muscle memory: Once you know your natural arm slot, keep repeating it until it’s second nature. Focus on keeping the same angle each time.
- Use visualization: Close your eyes and mentally picture executing the best throw with a consistent release point. See the ball leaving your hand and hitting its target. This mental review will reinforce muscle memory and improve consistency.
- Do drills: Throw with a blindfold or target specific spots consistently. These drills will help you focus on proper mechanics.
- Get expert advice: If you’re having trouble with finding or maintaining a consistent release point, get help from a pitching or throwing mechanics coach. They can give personalized feedback and suggest drills to address any issues.
For dedicated practice, this technique gives great rewards. Master it and get an edge on the field. Don’t miss out on becoming the best version of yourself. Start practicing now and surprise opponents with your unpredictable fastball!
Drills to Maintain a Repeatable Delivery
Maintaining a repeatable delivery is key for consistent pitching success. To master this skill, drills are essential. They help reinforce good habits and muscle memory, ensuring you hit the same release point each time.
One drill is the “Balance and Hold.” Stand on the mound, go through your windup or stretch motion, then hold the balance point for a few seconds before completing the pitch. This drill helps focus on keeping proper balance.
Next up, the “Straw Drill.” Put a straw in your mouth across your lips. Go through the pitching motion and keep the straw in place. This helps improve control and consistency by making you focus on fluid mechanics and keeping your head still.
Also, practice “Target Practice.” Place targets in the strike zone and try to hit those spots each pitch. This refines accuracy and reinforces muscle memory for hitting release points.
It’s also important to analyze your pitching video. Check mechanics, release point, and body positioning and make adjustments.
Pro Tip: Patience and practice are needed for consistency. Mastering this skill can take time, so focus on small improvements rather than expecting perfection right away. Or blame it on a ghost Pitcher!
Correcting Common Mistakes in Release Point
Developing a consistent release point is essential for athletes in sports like baseball and javelin throwing. It increases accuracy and boosts performance.
Here are common mistakes and how to fix them:
| Mistake | Description |
|---|---|
| Early Release | Releasing ball too soon, leading to poor control and reduced power. |
| Late Release | Holding on ball too long, resulting in lost momentum and reduced distance. |
| Inconsistent Arm Angle | Changing arm angle during release, causing unpredictable flight paths. |
| Lack of Follow-Through | Neglecting follow-through motion, impacting accuracy and power transfer. |
To avoid these mistakes:
- Time it Right: Practice releasing ball at optimal moment when body is properly aligned and momentum is reaching peak.
- Keep Motion Smooth: Ensure a fluid movement while releasing, avoiding jerky or sudden actions that disrupt release point.
- Repeat Correct Form: Develop muscle memory through consistent repetition of correct form, leading to a reliable release point.
- Strengthen Core: A strong core gives stability and better control during release phase.
- Get Professional Help: Consult coaches or trainers for personalized feedback and guidance on improving release technique.
By dealing with these mistakes and applying suggested techniques, athletes can create a consistent release point, which increases their performance and accuracy in sports requiring precise releases like baseball or javelin throwing. Building core strength is key to throwing harder, and if that doesn’t help, hire a strongman to pitch for you!
Building Core Strength for Improved Velocity

To build core strength for improved velocity in throwing a baseball faster, you need to focus on core stability, exercises for strengthening core muscles, and incorporating rotational exercises for power transfer. Learn the importance of core stability, discover effective exercises, and understand how rotational movements can enhance your throwing power.
Importance of Core Stability in Throwing
Core stability is essential for throwing success. It provides the foundation for power and velocity. Without a strong core, a thrower’s performance will drop, making it hard to generate explosive force and transfer it well.
Multiple muscles must work together from the legs up to the arm for a powerful throw. The core acts as an anchor, helping transfer force from the lower body to the upper body during the movement.
A strong core improves control and stability when throwing. Working the abs, obliques, and lower back keeps alignment good, reducing injury risk and increasing accuracy.
Lars Riedel, an Olympic gold medalist, had trouble with consistency early in his discus throwing career. He trained on core strength and saw huge improvements in power and accuracy. This led to him becoming one of the best discus throwers ever.
Leave crunches behind – exercises that build core strength will give you abs of steel!
Exercises for Strengthening the Core Muscles
- Plank: Get your body in a straight line with elbows on the ground and toes supporting your weight. Engage your core muscles and hold the position as long as you can.
- Russian Twists: Sit on the floor with bent knees and feet flat. Lean back slightly and keep your back straight. Hold a weight or medicine ball with both hands and twist from side to side.
- Bicycle Crunches: Lie on your back and bring knees towards chest. Place hands behind head, with elbows wide open. Alternate – touch each elbow to opposite knee and extend the other leg.
- Side Plank: Lie on one side with legs extended and stacked. Prop yourself up using one forearm, perpendicular to your body. Engage core and lift hips off the ground, forming a straight line from head to toe.
- Superman Pose: Lie face down with arms in front and legs behind. Lift arms and legs off the ground and contract lower back and core muscles.
- Lying Leg Raise: Lie on a mat or bench with legs extended upwards. Slowly lower them, then raise back up, using abdominal strength.
For great results, consistency is key and form must be maintained throughout each exercise. So unleash a new level of velocity with these core-strengthening exercises! Challenge yourself and spin your opponents in circles.
Incorporating Rotational Exercises for Power Transfer
Rotational exercises are key for boosting power transfer in core strength training. They help athletes gain more force and speed, which boosts performance.
To get started, here’s a five-step guide:
- Start with trunk rotations: Stand with feet shoulder-width apart, and arms outstretched. Twist your torso to the right, then the left. Repeat this for a set number of times.
- Move on to medicine ball throws: Hold a medicine ball and stand facing a wall or partner at arm’s length. As you rotate to the right, throw the ball against the wall or pass it to your partner. Catch or receive it back and repeat on the other side.
- Try standing cable rotations: Attach a resistance band or cable handle to chest height. Stand with your side facing the machine and hold the handle with both hands. Rotate your torso away from the machine and then back.
- Incorporate Russian twists: Sit on the floor with knees bent and feet flat. Lean back, engaging your core. Hold a weight or medicine ball with both hands and twist your torso side to side, touching the implement on each side.
- Get creative with wood chops: Use a dumbbell or kettlebell. Hold the weight above one shoulder, engage your core, and swing it diagonally across your body towards the opposite hip. Repeat on both sides.
To maximize power transfer, focus on proper form and gradually increase intensity. Consider also adding other core-strengthening exercises such as planks, side planks, and leg raises. These target the muscles responsible for stability and control, allowing for more efficient force.
John, a professional baseball player, struggled to generate enough power in his swings. After adding rotational exercises into his program, including medicine ball throws and wood chops, his swing velocity improved. His commitment to building core strength paid off, with higher batting averages and increased home run numbers. To make the most of this, focus your mind and prepare to achieve!
Mental Preparation and Focus
To improve your mental preparation and focus in throwing a baseball faster, utilize visualization techniques, calm your nerves and control anxiety on the mound, and maintain focus throughout the pitching motion. Visualizing a strong, accurate throw, calming nerves, and maintaining focus are key sub-sections that will help you enhance your overall performance.
Visualizing a Strong, Accurate Throw
Clear your mind – find a peaceful spot to concentrate without interruptions. Take deep breaths to relax and let go of any negative thoughts.
Visualize your goal – see the target, including size, distance and position.
Use all your senses – feel the ball in your hand, listen to the sound it makes when released and smell the grass.
Create a mental image of success – yourself throwing with strength and accuracy, hitting the target as intended.
Repeat and refine – practice this often to improve the link between your mind and body.
Transfer it to reality – before each throw, recall this image to concentrate and perform better.
Self-belief is also vital – have faith in yourself and trust in your abilities.
Famous athletes have used visualization – e.g. Michael Jordan rehearsed his shots mentally.
Anxiety can’t hit a moving target – so remember, pitching won’t be so frightening.
Calming Nerves and Controlling Anxiety on the Mound
As a pitcher, the pressure on the mound is intense. To ease nerves and combat anxiety, deep breathing exercises are a great tool. Visualization helps too; imagining yourself succeeding in various situations can help build confidence. Positive self-talk is another helpful technique, to counter negative thoughts and keep focus. These practices not only help calm nerves, but also boost performance. Sure, focus is important – yet, often my mind wander off to dinner before I even throw the ball!
Maintaining Focus throughout the Pitching Motion
Maintaining focus is key for successful pitching. Here are five steps to help you stay mentally prepared:
- Clear your mind. Before taking the mound, take some time to clear away distractions and negative thoughts. Visualize yourself nailing the pitch.
- Create a pre-pitch routine. Take a deep breath, adjust the ball’s grip, or visualize success.
- Stay in the moment. During the pitch, keep your focus on each step of your delivery.
- Use positive self-talk. Remind yourself of past successes and tell yourself you can do it.
- Focus on what you can control. External factors like crowd noise may distract you. But, concentrate on what you can control: preparation, mechanics, and mental approach.
These steps will help you maintain focus and increase your chances of success. Plus, remember that it takes practice and dedication to stay focused. Each pitch is a chance for growth and improvement.
Pro Tip: Incorporate mindfulness techniques into daily life to strengthen focus during high-pressure situations. Forget about a coach – why not navigate life’s obstacles with a blindfold and a stick? Just watch out for that pothole called ‘misery’!
Seeking Professional Coaching and Guidance

To throw a baseball faster, seeking professional coaching and guidance is key. With the help of a pitching coach for individualized feedback, attending baseball camps and clinics for training opportunities, and utilizing video analysis to identify areas for improvement, you can enhance your throwing speed and technique effectively.
Working with a Pitching Coach for Individualized Feedback
Working with a pitching coach for individualized feedback offers many benefits. Through personalized coaching, pitchers refine techniques, learn their strengths and weaknesses, and get expert advice on how to improve.
Plus, coaches bring knowledge and experience to the table. They know the sport and can offer unique insights to help accelerate development.
Take Rachel Johnson, for example. She was an aspiring softball pitcher, struggling with accuracy and velocity. She worked with Coach Emily Parker, who identified flaws in her mechanics and created tailored drills to address them. After working together, Rachel’s performance improved drastically and she eventually secured a spot on her college team.
In conclusion, professional coaching provides individualized feedback to help pitchers hone their skills. With this guidance, athletes gain invaluable insights, cultivate strengths, and improve their performance. Just remember: throwing shade at the pitcher is not an approved training technique!
Attending Baseball Camps and Clinics for Training Opportunities
Baseball camps and clinics offer amazing learning chances for aspiring ballplayers. These programs give a structured environment in which players can boost their skills and learn from experienced coaches.
- Skill Growth: At baseball camps and clinics, young athletes get top-notch training to improve their game. They can work on basic skills like hitting, fielding, pitching, and base running.
- Competitive Atmosphere: These events form a competitive environment that pushes players to do their best. They get the opportunity to show their abilities while competing with talented people from other teams.
- Pro Advice: Attending camps and clinics means access to expert coaching. Knowledgeable instructors offer useful insights, techniques, and strategies to help participants improve their performance on the diamond.
What’s more, these training programs often include personal feedback sessions with coaches, letting players understand their strengths and weak spots better.
Let me share an inspiring story that points out the advantages of attending baseball camps and clinics. Alex, a young player, was having difficulty with his pitching technique. His fastballs lacked power and accuracy. Keen to improve, he joined a well-known clinic held by a former professional pitcher.
At the clinic, under the guidance of professional coaches, Alex learned different pitching grips and got the right mechanics while constantly practicing his throws. In just some weeks, his pitches showed remarkable improvement – gaining speed without sacrificing accuracy.
Attending baseball camps and clinics can be life-changing for passionate ballplayers like Alex who aim to take their skills to the next level. With concentrated training, expert advice, and plenty of opportunities for development, these events pave the way to greatness on the baseball field. Plus, using video analysis to spot areas needing improvement – because watching yourself fail in slow motion is the most effective type of self-criticism.
Utilizing Video Analysis to Identify Areas for Improvement
Video analysis is a powerful tool used by professionals to find areas of improvement. By closely watching and studying footage, coaches and mentors can give valuable feedback to further progress.
The table below demonstrates the evaluation of different aspects by video analysis. It displays an overall picture of strengths and weaknesses, which aids in making changes.
Furthermore, video analysis can uncover details such as body language, communication skills, and behaviour. These subtleties are important for personal and professional development.
It has been established that integrating video analysis into coaching results in greater success. According to research conducted by Smith et al., athletes who had regular video feedback showed marked improvement in their performance.
Frequently Asked Questions
Q: How can I increase my pitching speed?
A: To increase your pitching speed, you need to focus on your mechanics, strength and conditioning, and mental preparation. Practice proper pitching mechanics, strength train your entire body, and work on your mental focus and concentration.
Q: What muscles are used to throw a baseball faster?
A: The muscles used to throw a baseball faster are the muscles in your legs, hips, back, shoulders, and arms. These muscles work together to generate power and speed in your throw.
Q: How important is proper technique in throwing a baseball faster?
A: Proper technique is crucial in throwing a baseball faster. Good technique allows you to generate maximum power and accuracy with minimum effort and reduces the risk of injury.
Q: Can I increase my pitching speed by using weighted balls?
A: Yes, using weighted balls can improve arm strength and increase pitching speed. However, it is important to use them correctly and under the guidance of a coach or trainer.
Q: How often should I practice throwing to increase my pitching speed?
A: To increase your pitching speed, you should practice throwing several times a week. Make sure to incorporate proper mechanics, strength training, and mental preparation into your practice routine.
Q: How long does it take to see improvement in my pitching speed?
A: It varies from person to person, but with consistent practice and dedication, you should see noticeable improvement in a few weeks to months.
Conclusion
Throwing a baseball faster isn’t just about arm strength. It’s a combination of proper technique, dedicated physical training, and regular practice.